


Health | July 2024
Got Joint Pain? Getting Fit Doesn’t Have to Cause You Pain (Here’s Why)
Staying fit, active, and mobile as you age often feels like an uphill battle.
But when you have stiff, painful, joints it can be extra challenging.
That’s why we’ve put together this handy guide, showing you:
- Why resting can actually make joint pain worse
- 1 handy pre-exercise tip to loosen your joints (Not stretching!)
- The 3 best exercises to relieve painful joints
- How to get fit without aggravating your joints
To stop stiff, painful joints being a barrier to doing what you love…
And help you stay fit and mobile enough to hike, garden, and do whatever makes you happy.
1. Warm Up (Literally!)
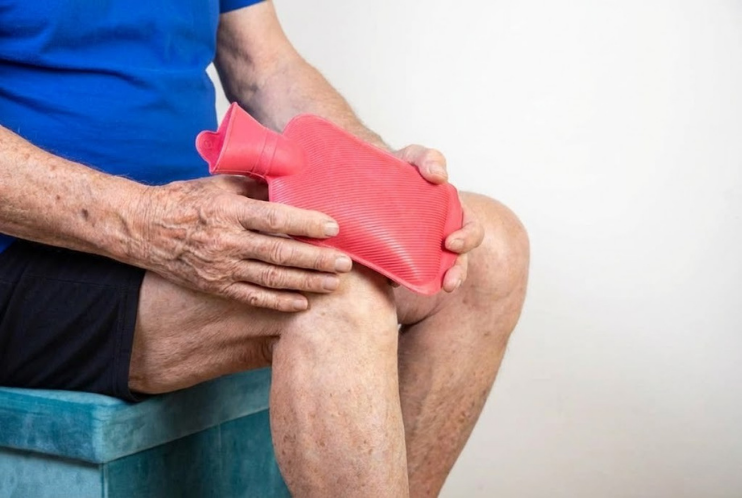
Before starting exercise, use a hot water bottle or heat pad to apply heat to painful joints.
it should NOT be painfully hot. Use for roughly 20 minutes.
When you warm a sore joint, the blood vessels surrounding it get bigger. This allows more blood, oxygen, and nutrients to be delivered to the injury.
In short, giving it what it needs to heal!
Heat will also relax the joint and the muscles around it. This makes them more flexible to move and stretch without injury.
TOP TIP: Heating sore joints is a good idea even when you’re not about to exercise. Particularly at times when joint pain is bad – the mornings or in cold weather, for example.
2. Range-of-motion Exercises
These reduce stiffness by making your joints move in every direction they can.
If muscles and joints aren’t stretched on a regular basis, they’ll ‘shorten’. This means they become increasingly fixed in one position.
This makes it even more difficult and painful to move in the long term.
Here are some examples of range-of-motion exercises:
Roll your shoulders and hips in circles. Make a slow and controlled kicking motion with your knees.
These are gentle but important exercises you can do daily. Gradually lessening stiffness and pain so you can keep full use of your joints.
So you can keep reaching up, lifting things, bending down, and walking like normal.
3. Strength-Builders (with examples!)
It’s so important to strengthen the muscles around your sore joint.
You see, a strong frame around your weak joint will support and protect it. Preventing it buckling out of place.
Keeping strong is also vital for staying able to walk, climb the stairs, and move around like you used to.
After all, studies show you can lose 4% of your muscle mass every year after 40!
So here are some great exercises to strengthen the muscles around your knees, hips, and shoulders. (3 often problematic joints!)
Though it would be ideal to incorporate each one into your exercise routine 2-4 times a week…
When starting out, don’t push yourself too far. If any cause sharp pain, stop immediately.
Start slowly and build up to trying them all.
KNEES
‘Seated Knee Extension‘
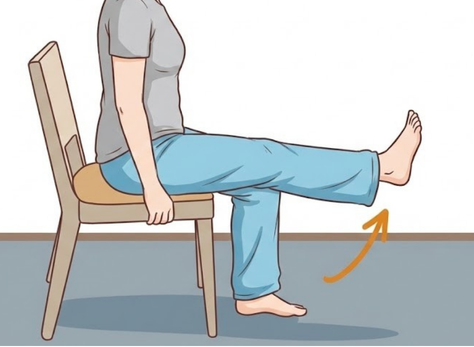
Sit on a chair and place a light resistance band around your ankles.
Slowly raise your knee until it locks. Hold this position for 7 seconds before slowly lowering your leg back to a seated position.
Repeat this 5 times on each knee. Repeat the set 3 times.
TOP TIP: If the resistance band is too difficult – or you don’t have one – remove it and do the rest of the exercise as described.
‘Knee Bends’
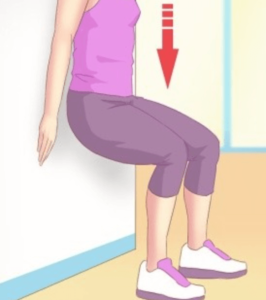
Stand a foot away from a wall with your knees hip-width apart. With your feet pointing slightly outwards.
Slide your back down the wall by slowly bending your knees. Do not let your knees go past your toes but point them in the same direction.
As you come up, focus on tensing the muscle above your knee and your buttocks.
TOP TIP: for a really smooth movement, put an exercise ball (or soft football) between your back and wall.
HIPS
‘Hip Raise’
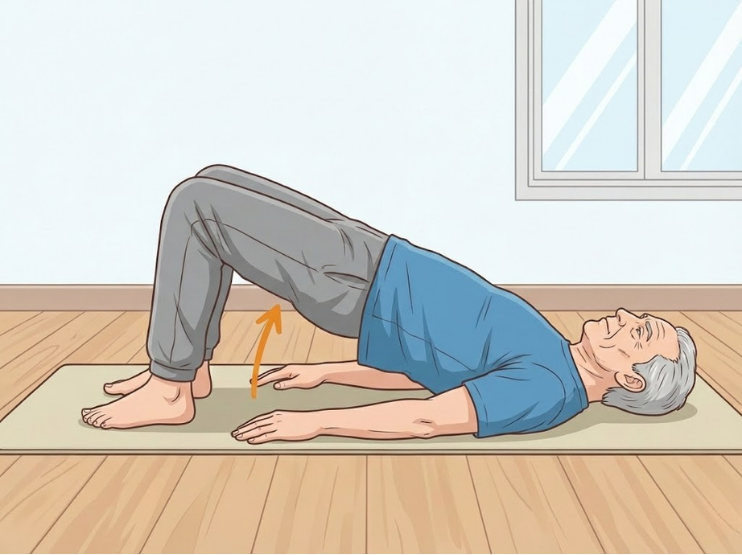
Lie on the floor with your arms by your side and your knees pointing to the ceiling.
Engage your stomach muscles and lift your hips until your legs and stomach form a straight line.
Hold this position for 10 seconds. Then, slowly lower yourself to the starting position.
Repeat this motion 10 times.
TOP TIP: If this is too hard, you can do the same movement but on the sofa so you don’t have to get down to the floor.
Lifting your hips lower (so they don’t make the straight line with your stomach) will also make it easier.
‘Sideways Walk‘
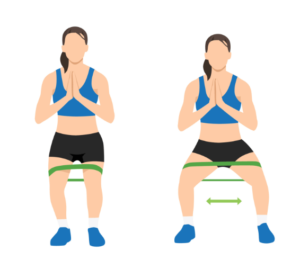
Place a light resistance band around your thighs (just above the knee).
Bend your knees to make a slight squat position and take long sideways steps (like a crab!) with your ankles meeting between each step.
Take 5 steps in one direction before doing 5 in the opposite direction. Repeat this 5 times.
TOP TIP: If you don’t have resistance bands, do the same movement but in a deeper squat position. To do this, bend your knees a bit more.
SHOULDERS
‘Emptying Cans‘
An odd name for an exercise but it’s great for shoulder strength and mobility.
Place your arms by your sides and then push them slightly further back.
Turn your thumbs down and then raise your arms upwards towards your eyes. As you do this, rotate your wrists inwards (as though emptying two cans).
Hold this position for 10 seconds before slowly lowering your arms.
Repeat 8 times.
If you want to make this more challenging, hold light weights as you do this motion.
4. ‘Joint-friendly’ Sports
Aerobic exercise (aka cardio) is anything that makes your heart beat faster than usual and quickens your breath.
The best sports for fitness which also protect your joints are cycling and swimming.
This is because they don’t make your joints have repeating hard and damaging impact with the ground. Unlike in running and jumping.
This means you can build your aerobic fitness (and strength too!) without having to damage your joints in the process.
Try to do 2 hours of aerobic exercise per week. We recommend doing this over several days. Especially when first introducing exercise into your lifestyle.
5. Ice
Whether you’ve done strengthening or aerobic exercise, it’s a good idea to ice your joints afterwards.
It will reduce swelling and keep your joints moving more smoothly. Ice for roughly 20 minutes.
So there you have it!
Your perfect starter guide to building up your fitness, strength, and flexibility. All while actually protecting your joints and easing their pain.
Just remember to start gently and build up your exercise routine so your body can get used to the new movements.
And as we said earlier, if you feel a sharp pain when doing any of these exercises, stop immediately.
But we’re confident you’ll be just fine – and the more you do them, the easier they’ll become!
So get up and active and you’ll be amazed by how long you can carry on walking, climbing, and pottering in the garden.